Palo Alto Networks log forwarding for threat tagging

We’ll be using Palo Alto Networks log forwarding for threat tagging in combination with dynamic groups to help block IP’s acting shady. As long as you know what kind of traffic you think should warrant a quarantine, you should have no problem dropping it as soon as it occurs.

  1. Open Object -> Log Forwarding
  2. Add or modify an existing log forwarding rule
    You can use a single log forwarding for all your tagging rules, as well as syslog forwarding if you’d like to.
  3. Press «Add» to add a new Match List.
  4. Select your log type, and a filter.
    For the first example we’ll be using the URL filter log, and using a query that will tag anyone outside of Norway attempting to access the /wp-admin or /xmlrpc.php files.

    As long as the filter is giving you the correct result when viewed in the URL filter log, you’ll be good.

    If you press in the downward arrow on the right side of the Filter box, you can also use the Filter Builder to show you available fields as well as validating the output of your filter.

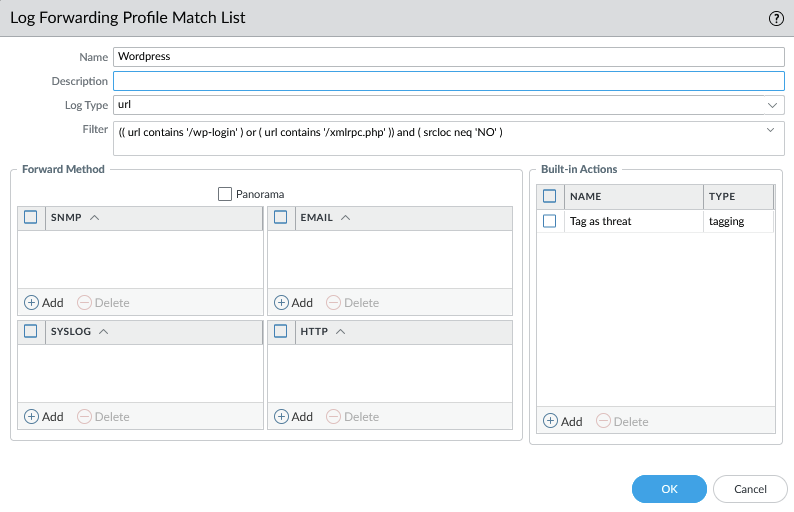
  5. Under Built-in actions, select tagging.
    We’d like to set the source address as the target, this being the IP that will be given a tag. In my home lab I’ve got a single tag, but at work we’re using seperate tags for internal and external threats.
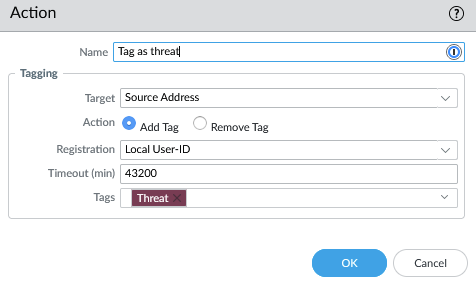
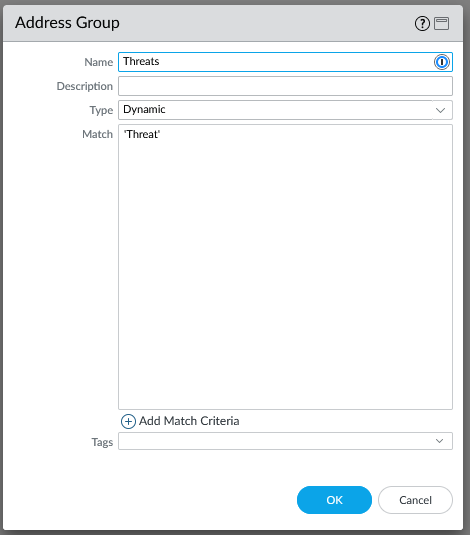
  6. With that done, head off to Objects – Address Group.
  7. Press Add to create a new dynamic group, set the match to ‘Tagname’.
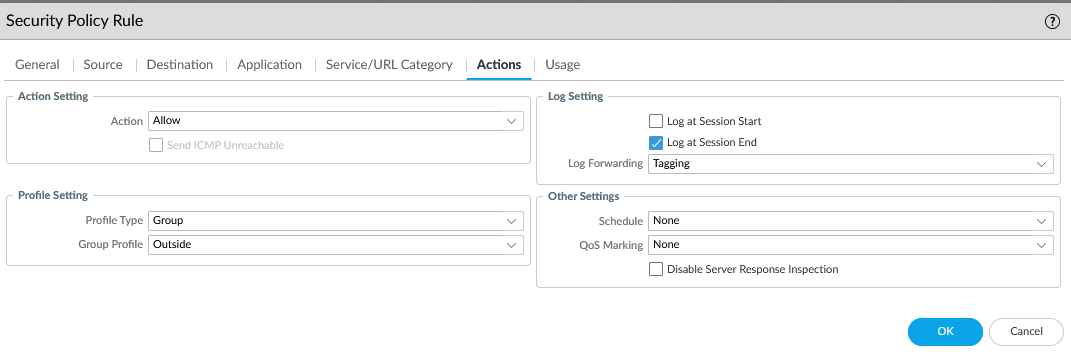
  8. Go to Policies, add the newly created dynamic group to an inbound drop rule
    Use different policies for different kinds of traffic, of course, but as the one we’ve just created is for Internet traffic, add it accordingly.

    You might want to start with step 9, so you can see what populates first, and see if anything is tagged erroneously.


  9. Add the log forwarding rule to any applicable rule you have.

A couple of usefull log filters
Blacklist traffic going to high value targets if not coming from a trusted network:
(( zone.dst eq Backup ) or ( zone.dst eq Management)) and ( zone.src neq Privileged )

Blacklist anyone triggering a medium or higher severity threat:
( severity geq 'medium' ) and ( zone.src eq 'Internet' )

Adjust this to fit your network, of course.

Oh no, I blacklisted legit traffic and now people are yelling at me!
How do I fix this?

  1. Go to Objects -> Address Groups
  2. Find the dynamic group, and under «Addresses», click «More».
  3. Find the IP in question
  4. Press Unregister tags.
  5. Press Add, add the tag you’d like to remove (such as ‘Threat’) and press OK twice.
  6. Done, no need for a commit.

Further reading:

Why I don’t trust PowerDMARC – and why you shouldn’t either.

We were in the process of finally getting DMARC fixed for all of our domains, and we had a supplier come and pitch PowerDMARC to us.

PowerDMARC, they told us, was the leading DMARC service in Norway, and was an ISO27001 certified provider headquartered in the United States.

After doing a quick trial with PowerDMARC we started with due dilligence, and the first red flags started to appear when trying to find company information.
Their site mentions a head office address in Delaware, but the actual name of the company was only to be found in their Data Processing Agreement.

This led us to MENAINFOSEC, Inc., still listing it’s principal place of business to be Delaware in the United States.

It turns out that 651 N Broad St in Middledown, Delaware is an anonymous office building, without any corporate logos. A few searches later makes it clear that this office building serves as a virtual office for several dozen other companies, and even several sharing Suite 206. Must be a crowded place.

Their LinkedIn profile doesn’t to much to help improve on the already shady first impressions, with only a single employee out of eighteen reporting to be based in Middletown.

So the company is not based in the US, and this throws their entire data processing agreement into jeopardy. But at least they’re ISO27001 certified, right?

Well, it turns out that their certification body, BQSR Quality Assurance Pvt. Ltd., at least had their customer account with IAS (International Accreditation Service) canceled in july.

So it could be that PowerDMARC is a completely legit company, but there sure is a whole lot of smoke here.

Possible alternatives to PowerDMARC could be either dmarcian or uriports, but you should always vet your SaaS providers yourself.

How to resolve SMB file share issues in macOS Ventura

After Apple’s rollout of macOS Ventura (macOS 13) in late October of last year, we’ve been facing issues with accessing our internal Windows Server hosted file shares.

The issues has varied from Adobe Premiere throwing error messages, to Powerpoint files becoming corrupted. It seems to be an issue where the opened files lose their write permissions, and when the application tries to save the file it no longer has acccess to do so.

Ever since Apple ditched SAMBA for their own SMB implementation, smb has been a returning issue with each new macOS update.

After experimenting with settings in nsmb.conf we’ve found that the following config has resolved most of the issues. This should be run in the Terminal, and will remove any existing config already present in nsmb.conf by removing the old one.

Note that write access to the /etc/ folder requires administrative privileges, so this will fail if the user either is not an administrator or fails to supply valid credentials.

sudo rm /etc/nsmb.conf -f
echo "[default]" | sudo tee -a /etc/nsmb.conf
echo "mc_on=no" | sudo tee -a /etc/nsmb.conf
echo "mc_prefer_wired=yes" | sudo tee -a /etc/nsmb.conf
echo "file_ids_off=yes" | sudo tee -a /etc/nsmb.conf
echo "signing_required=no" | sudo tee -a /etc/nsmb.conf
echo "dir_cache_off=yes" | sudo tee -a /etc/nsmb.conf
defaults write com.apple.desktopservices DSDontWriteNetworkStores -bool TRUE

This will set multichannel behavior as per Apple’s own article, disable file ID’s and directory caching, as well as prevent the creation of .DS_STORE files on the fileshares.

How to disable curve25519 / x25519 on Windows Server 2016

If you are using a Palo Alto firewall to do inbound SSL decryption, you might have run in to issues with decryption on Windows Server 2016 running IIS.

For us, this was due to the server using a key exchange not supported for SSL decryption in PANOS 8.1.

You probably don’t want to disable all ECDH key exchanges, so this one will just disable x25519 and will allow your Palo Alto firewall to do decryption.

Open up Powershell, type the following command:

Disable-TlsEccCurve -Name curve25519

If you run Get-TlsEccCurve before and after running the command you should be able to see if it’s been disabled or not.

After a reboot, IIS should not use x25519 for encryption.

For a complete list of supported ciphers in PANOS 8.1, see Palo Alto’s documentation.

Hvordan stoppe «Posten»-viruset

De siste dagene har det igjen vært en økning av «Posten-virus», altså eposter tilsynelatende sendt med Posten som avsender.
VG har skrevet en sak om dette her.

Eposten tar deg videre til en ekstern side og ber deg laste ned hentelapp, noe som resulterer i en komprimert fil (.zip) som inneholder en JavaScript-fil. (.js).
Åpner du og kjører JavaScriptet, vil dette da kryptere dataene på din maskin, og for en stor bunke penger vil du kanskje få igjen filene dine.

Dersom du er så uheldig å ha blitt rammet av viruset, er denne guiden dessverre ikke noe som nå vil hjelpe deg. Gå heller til Kasperskys «No Ransom»-side med ransomware-dekrypteringsverktøy.

I tillegg til å ha antivirus, en sunn dose paranoia og de siste oppdateringene til ditt operativsystem installert er det et par veier å få bukt med nettopp denne type malware.

Denne løsningen vil kjøre at .js-filer ikke lenger vil kjøres automatisk på din datamaskin, og så lenge de kun åpnes i Notisblokk vil de ikke kunne gjøre skade.

For privatbrukere med Windows:

Merk: Skjermbildene er fra Windows 10, men fremgangsmåten er relativt lik på Windows 7.

  1. Åpne Notisblokk/Notepad.
  2. Velg lagre som, og lagre den på skrivebordet som Test.js.
  3. Gå til skrivebordet, høyreklikk på «Test.js» og velg «Åpne i» og «Velg en annen app».
  4. Velg «Notisblokk», og huk av for «Bruk alltid denne appen for å åpne .js-filer».

Til systemadministratorer med Windows-systemer:

  1. Aktiver SPF på ditt domene, og kjør hard blokkering av innkommende epost som feiler SPF-sjekk. Dette vil også hjelpe deg mot CEO-svindel.Postnorge.no, ett av domenene benyttet i siste utsending, hadde da epostene gikk ut, ikke SPF-liste for dette domenet, men dette er heldigvis nå aktivert.
  2. Opprett en group policy for samtlige brukere som setter Notepad.exe som standardapplikasjon for .js-filer.Denne policyen ligger under «User Configuration – Preferences – Control Panel Settings – Folder Options».
  • Action: Update
  • Name: js
  • Associated Program: %WindowsDir%\System32\notepad.exe